For over a thousand years, the city of Fez has been the undisputed capital of zellige craftsmanship — a tradition so refined, so demanding, and so singular that no factory on earth has successfully replicated it.
What Is Zellige? Origins and History
Zellige derives from the Arabic word al-zillij, meaning "small polished stone." The art form emerged in Morocco during the 10th century, drawing on Persian, Byzantine, and Andalusian ceramic traditions that arrived through centuries of trade and conquest across the Mediterranean.
By the 14th century, during the reign of the Marinid dynasty, zellige had reached its artistic apex. The grand mosques, madrasas, and royal palaces of Fez, Marrakech, and Meknes were adorned with vast geometric compositions — each one an intricate puzzle of hand-cut ceramic pieces assembled without mortar, their patterns radiating from a single mathematical center point.
The Bou Inania Madrasa in Fez, completed in 1356, remains the finest surviving example of medieval zellige work — its lower walls entirely covered in geometric mosaics of extraordinary complexity, so mathematically precise they appear almost impossible to have been executed by hand.
"The workshops of Fez still operate in the same narrow streets of the medina where they have stood for six centuries. The tools have barely changed. The clay comes from the same deposits."
— Mediterranean Pool TilesWatch the zellige tradition come to life in Fez
This film adds movement and context to the article, showing the human rhythm behind authentic Moroccan zellige production — the workshop atmosphere, manual handling, and artisan pace that cannot be captured in still images alone.
The Raw Material: Clay from Fez
The starting point of every zellige tile is a very specific type of clay found only in the hills surrounding Fez. This clay — a natural terracotta-rich deposit with a distinctive reddish-brown color — has a plasticity and firing behavior unlike clays found elsewhere in Morocco or abroad.
It contains a precise balance of minerals that allows it to accept a wide range of mineral glazes without crazing or peeling, withstand repeated firing cycles without warping, and develop the characteristic imperfect thickness that gives zellige its handmade depth. Imported clays and mass-produced bisque tiles cannot replicate these properties. Authentic zellige begins with authentic clay. There is no substitute.
The Eight Stages of Zellige Production
Clay Preparation & Wedging
Freshly extracted clay is mixed with water in large basins and allowed to settle, separating impurities from fine clay particles. The resulting slip is dried to a workable consistency, then wedged — a labor-intensive process of repeatedly folding, pressing, and turning the clay by hand — to eliminate air bubbles and achieve a uniform density. A skilled maalem can assess the readiness of a clay body by feel alone.
Hand Pressing Into Plaster Moulds
Unlike industrial tiles pressed under hydraulic pressure, zellige tiles are formed by hand using simple plaster moulds. The maalem takes a ball of prepared clay and presses it firmly into the mould, smoothing the back with a wooden paddle and trimming the edges. Each tile varies slightly in thickness — typically between 12mm and 18mm — creating the characteristic relief that distinguishes authentic zellige from machine-made imitations. This variation is not a defect. It is the evidence of human involvement.
Slow Drying
Formed tiles are left to dry slowly in open air, away from direct sunlight and drafts. Rapid drying causes uneven shrinkage, which leads to warping and cracking. In the dry summer climate of Fez, tiles may dry within a few days. In cooler, damper winter months, the process can take up to two weeks.
Bisque Firing — The First Kiln
Bone-dry tiles are loaded into a traditional wood-burning kiln — a dome-shaped structure of fired brick, identical in design to kilns used in Fez for five centuries — and fired to approximately 950–1000°C over 12 to 18 hours. The kiln temperature is controlled entirely by experience: the maalem reads the color of the flame, the behavior of test tiles, and the sound of the fire. No thermocouples. No digital controllers. Pure mastery.
Glaze Preparation — The Alchemy of Colour
Glazes applied to zellige tiles are mineral-based formulations derived from metal oxides, silica, and fluxing agents — recipes guarded jealously by the maalems of Fez, passed from father to son across generations.
Produces the intense, saturated blues iconic to Moroccan decorative arts — appearing near-navy in shade and electric blue in direct sunlight.
Produces greens and turquoises ranging from pale celadon to deep forest green. Particularly sensitive to firing temperature — each batch yields subtly different results.
Produces blacks, deep browns, and purples. The most stable and consistent of the traditional zellige colorants.
Produces warm ochres, ambers, and burnt oranges — including the characteristic terracotta tone of unglazed zellige clay itself.
Glaze Firing — The Second Kiln
Glazed tiles return to the kiln for a second firing at 1020–1080°C. During this firing, the glaze melts, flows, and fuses permanently to the ceramic body. Temperature variations within the kiln affect color development — a kiln loaded with copper-glazed tiles may produce an entirely different shade of green at the top versus the bottom. This unpredictability is not a flaw. It is why zellige is irreplaceable.
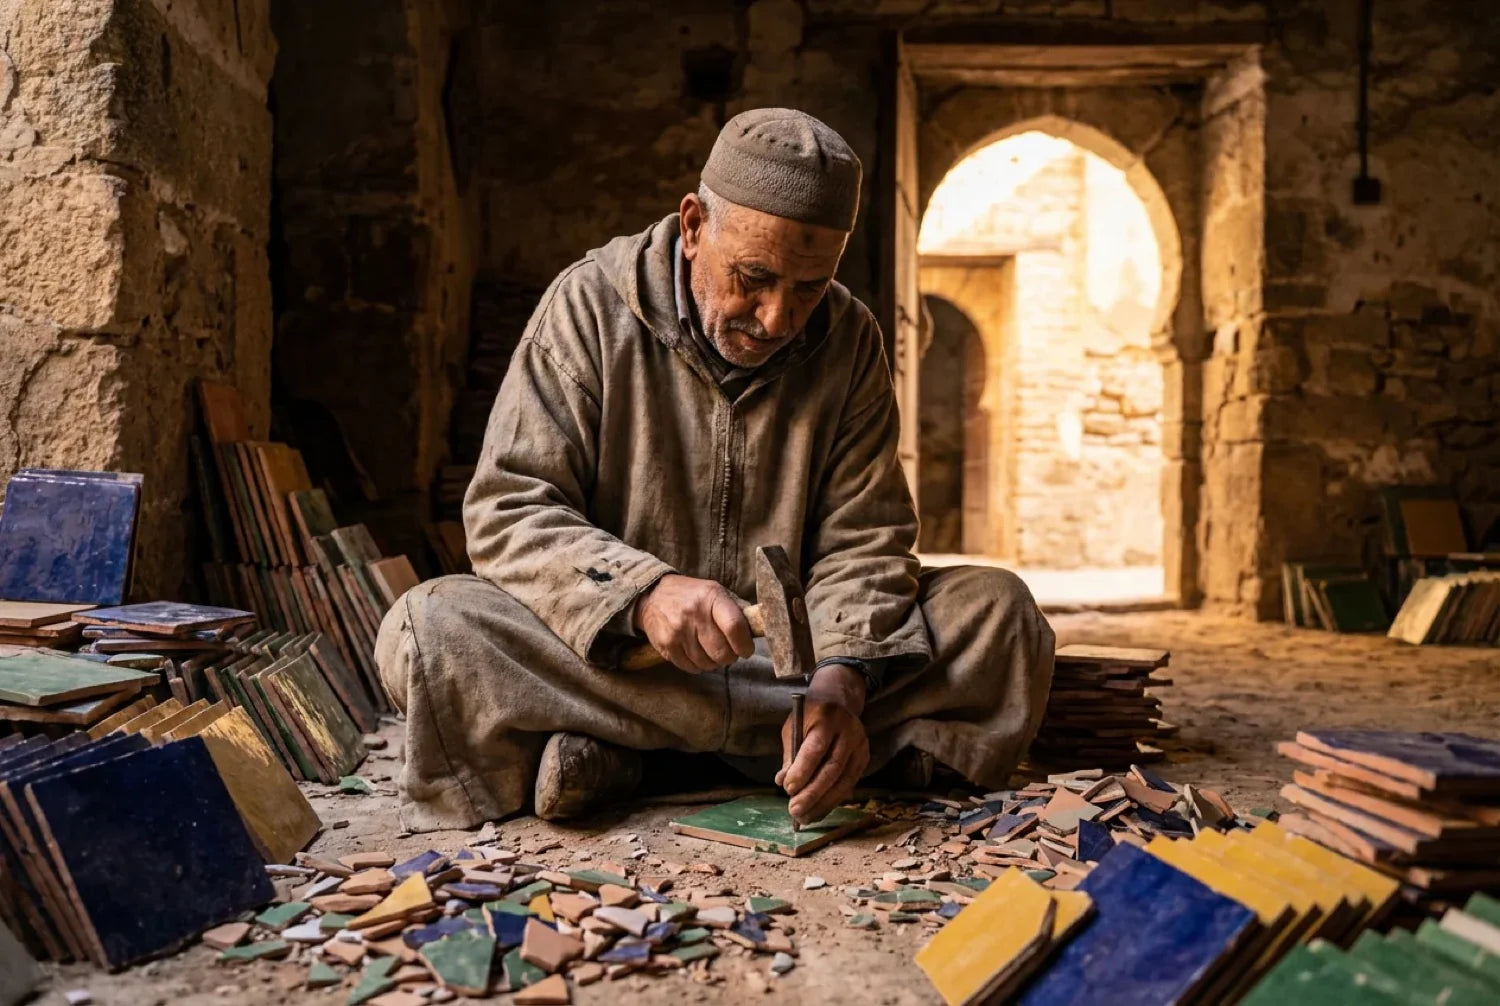
Hand Cutting — The Ferr and the Maalem
The glazed tile is cut into precise geometric shapes using a ferr — a small, pointed steel chisel struck against an iron anvil. The maalem holds the tile face-down and strikes with a precise, controlled blow. The tile splits cleanly — or, if the angle or force is slightly off, shatters irreparably. There is no second chance. A skilled cutter produces several hundred pieces per day. A complex pattern for a large installation may require thousands of individually cut pieces.
Pattern Assembly — The Zouak
Cut pieces are assembled face-down on a flat surface in a process called zouak. Working from the center outward, the maalem places each piece precisely according to the pattern. When fully assembled, pieces are grouted from behind with liquid plaster. Once set, the entire panel is lifted as a single unit and pressed into lime mortar at the installation site. The plaster backer is then wetted and removed, revealing the polished, faceted face of the zellige for the first time.
A closer look at hand forming, glazing, and finishing
Placed after the eight production stages, this video reinforces the article’s educational value by helping readers visualize the tactile, imperfect, and highly skilled nature of handmade tile production.
The precision behind ferr cutting and mosaic assembly
This final video supports the sections on cutting and pattern assembly, highlighting the exacting manual work that gives zellige its signature geometry, variation, and architectural depth.